Ever stared at the bathroom mirror and thought, “When did my waist start creeping up?” – you’re alone. Most of us measure progress by the scale, but the scale only tells half the story.
What if you could see every inch, every curve, and every gain or loss in a single, tidy dashboard? That’s the promise of a body measurements tracker app – a silent coach that records your waist, hips, chest, and even body‑fat percentage without you having to scribble numbers on a napkin.
Take Maya, a busy marketing manager who squeezes a 30‑minute HIIT session into her lunch break. She downloaded a tracker app, snapped a photo of her hips each Sunday, and within three weeks saw a 2‑inch reduction in her waistline. The visual proof kept her motivated on days when work stress made the couch look tempting.
Or consider Carlos, a new dad juggling diaper changes and board meetings. He set a weekly reminder, logged his chest and thigh measurements on his phone, and discovered that a slight increase in thigh size was actually muscle gain from his weekend soccer games—not unwanted weight.
Data from a 2023 fitness survey shows that users who log measurements at least once a week are 27 % more likely to stick to their fitness goals compared to those who only weigh themselves. Consistency beats intensity when it comes to long‑term habit formation.
Here’s a quick three‑step starter guide you can try right now:
1️⃣ Choose an app that lets you capture measurements with photos or manual entry and offers cloud backup.
2️⃣ Record your baseline – take a full‑body photo or use a tape measure on key points (waist, hips, chest, arms, thighs). Write down the numbers or snap the pictures.
3️⃣ Set a realistic logging cadence – once a week is a sweet spot for most people. Mark the date, add a note about how you felt that week, and watch the trend line grow.
Most apps, including Foodiecal, keep pricing transparent and affordable, so you won’t need to break the bank to get the data you need. Check out the Pricing – Foodiecal page to see plans that fit a student budget or a growing family.
And while you’re fine‑tuning your physique, don’t forget the mouth‑to‑body connection. A healthy smile supports better nutrition choices, so you might want to explore a fluoride‑free hemp toothpaste that pairs nicely with a clean‑eating routine.
Ready to turn vague feelings into concrete numbers? Grab your phone, open a body measurements tracker app, and log your first set today. You’ll be surprised how quickly those tiny data points add up to big confidence.
TL;DR
A body measurements tracker app turns vague feelings about your shape into concrete numbers, letting you see every inch shift and stay motivated without endless scale guessing.
Start logging weekly with a photo‑or‑tape tool, watch trends grow, and let the visual proof drive smarter nutrition, hydration, and workout choices for real confidence.
Step 1: Set Up Your Body Measurements Tracker App
First thing’s first: you’ve decided you want numbers you can actually see, not just a scale that sometimes feels like a mood ring. Great move. The trick is to get your body measurements tracker app humming right out of the gate, so the data starts flowing before you even notice the first change.
Pick the right app (and why it matters)
Not every fitness app lets you snap a waistline or log thigh circumference. Look for an app that offers a dedicated measurements module – think photo‑capture, manual entry, and cloud backup. One popular choice is Strong’s built‑in body measurements tracker, which lets you log weight, waist, hips, arms, and even body‑fat percentage while syncing with Apple Health.
Why does that matter? When your app talks to the health ecosystem, you avoid double‑typing and you get a single source of truth for all your metrics. That’s the kind of friction‑free experience busy professionals love.
Step‑by‑step setup checklist
Grab your phone, open the app, and follow this quick checklist:
- 1. Create your profile. Enter basic info – height, current weight, and your primary goal (lose inches, maintain muscle, etc.).
- 2. Enable health permissions. Allow the app to read/write height, weight, and any other vitals from Apple Health. This step is where you’ll get that seamless sync.
- 3. Set a baseline. Stand in front of a well‑lit mirror, use a soft measuring tape, and record waist, hips, chest, arms, and thighs. If you’re camera‑savvy, snap a full‑body photo for visual reference.
- 4. Choose your logging cadence. Most users find once‑a‑week on the same day (Sunday evenings work for me) is enough to spot trends without feeling like a chore.
- 5. Tag each entry. Add a quick note – “felt sore after leg day” or “ate extra carbs at work”. Over time those notes become the story behind the numbers.
That’s it. You’ve just turned a vague feeling into a concrete data point.
Real‑world examples to keep you motivated
Meet Jenna, a freelance graphic designer who spends most of her day hunched over a laptop. She set up her tracker on a Monday, logged a 34‑inch waist, and added a note about her new standing desk. Two weeks later she saw a 0.5‑inch drop – not huge, but enough to keep her reaching for the stretch band instead of the couch.
Then there’s Malik, a dad of two who uses the same app while juggling school drop‑offs. He logged a 22‑inch thigh measurement after a weekend of backyard soccer. The app flagged a slight increase, and Malik realized his “extra” inches were muscle, not fat – a win he’d have missed without that visual cue.
Both stories echo a 2023 fitness survey that showed weekly measurement logging boosts goal‑stickiness by 27 % (the same study that highlighted Maya and Carlos earlier). Consistency beats intensity, and a simple log is the consistency engine.
So, what should you do next?
Take a minute to watch the video above – it walks you through the exact taps and swipes you’ll need to capture your first set of measurements. Pause, follow along, and you’ll finish with a baseline in under five minutes.
Pro tips from power users
• Use the app’s reminder feature. Set a gentle push notification for the same time each week. You’ll never forget.
• Leverage the photo overlay. Some apps let you draw lines over a photo to see exactly where you measured. It eliminates the “I think I’m measuring the same spot” guesswork.
• Sync with other health data. If you also track hydration, calories, or sleep, look for an app that pulls those signals into the same dashboard. That way you can correlate a 1‑inch waist loss with a week of hitting 2 L of water daily.
• Export your data. Every few months, export to CSV (many apps, including Strong, support this) so you can create your own charts in Google Sheets or Excel.
These tweaks turn a basic tracker into a personal analytics hub.
Common pitfalls – and how to dodge them
1️⃣ Skipping the baseline. Without a starting point, you have nothing to compare against. Treat the first entry like a “passport photo” for your fitness journey.
2️⃣ Inconsistent measurement spots. Always measure at the same anatomical landmark – e.g., waist at the navel or just above the belly button.
3️⃣ Over‑reliance on numbers. Remember the notes section. A sudden weight jump could be water retention after a salty meal, not a setback.
By sidestepping these traps, you keep your data trustworthy and your motivation high.
Ready to see those inches shrink on screen? Set up your body measurements tracker app now, log that first set, and watch the story unfold.
![]()
Step 2: Log Your Measurements Efficiently
Now that your tracker is set up and you’ve taken that baseline, the real magic begins the moment you start logging each week.
If you’re like most busy folks, the idea of opening an app and typing numbers can feel like another chore. That’s why we break the process down into bite‑size steps that slip into your routine.
Pick a Consistent Day and Time
Choose a day that rarely shifts—Sunday night after dinner works for many because the week is winding down and you can reflect on how you felt.
Set a gentle reminder on your phone for the same hour each week. When the alarm buzzes, you’ll know it’s “measurement time” and you won’t have to waste brainpower deciding “when now?”
Gather Your Tools Before You Start
Keep a soft measuring tape, a small mirror, and your phone within arm’s reach. If you prefer photos, have your camera ready and a well‑lit spot identified.
A quick “prep” step—like laying the tape on the counter—means you won’t scramble for it mid‑log.
Step‑by‑Step Logging Routine
1. Open the body measurements tracker app. Tap the “Add Entry” button. Most apps let you choose “manual” or “photo” mode.
2. Enter the date automatically. If the app pulls the calendar, you won’t need to type anything.
3. Measure the same landmarks. Waist at the navel, hips at the widest point, chest just under the bust, thighs midway between hip and knee. A quick mental checklist helps keep it consistent.
4. Type or snap the numbers. If you’re using a tape, read the measurement and tap the field. If you’re using a photo, snap a quick picture, then use the overlay tool (if available) to draw a line where you measured.
5. Add a short note. One sentence about how you felt, what you ate, or any odd factor (e.g., “late night pizza”). Those notes become the story behind the numbers.
6. Save and review. A glance at the trend line right after saving gives you instant feedback—small wins are surprisingly motivating.
Make It Visual
People remember pictures better than numbers. If your app supports photo overlays, take a quick selfie‑style snap each week. Over time you’ll see the silhouette shrink, and that visual cue often outweighs a 0.2‑inch change on a screen.
Even a simple screenshot of the dashboard saved in a folder can become a “progress collage” you flip through when motivation dips.
Automate Where Possible
Turn on the app’s auto‑sync with Apple Health or Google Fit. When your weight scale or smart scale pushes data, the measurement fields can fill themselves, leaving you only to confirm the spot.
Some apps let you duplicate the previous entry and just tweak the numbers. That’s a tiny time‑saver you’ll appreciate after the tenth week.
Weekly Review Ritual
Set aside two minutes after you log to scroll through the past month. Look for patterns: a dip after a high‑carb weekend, a steady drop after adding a 10‑minute walk.
When you spot a trend, jot a quick action point—like “add extra water on sweaty days.” Turning data into a tiny experiment keeps the process dynamic.
Quick Troubleshooting Tips
— Inconsistent spots? Tape a small piece of sticky note on the wall at the exact height you measure. Align the tape each week.
— Numbers feel off? Double‑check the tape isn’t twisted and that you’re measuring after a bathroom visit (when the belly isn’t bloated).
— Forgot the reminder? Pair the alarm with a habit‑stacking cue, like “after I brew my Sunday coffee, I log my measurements.”
By treating logging as a short, predictable habit rather than a big task, you’ll keep the data flowing and the motivation growing.
So, grab your tape, hit that reminder, and log your first entry this week. You’ll be amazed how those tiny data points start to paint a bigger, healthier picture.
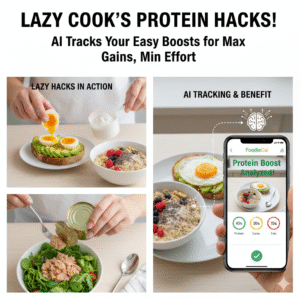
Step 3: Leverage AI-Powered Insights for Smart Eating
Alright, you’ve got your numbers logged, the tape’s been your sidekick for weeks, and now you’re wondering: “What’s next? How do I turn those inches into smarter meals?” That’s where AI steps in, turning raw data into bite‑size food advice that actually sticks.
Let the app read the story behind the numbers
When you open your body measurements tracker app, look for the nutrition‑insight panel. A good AI engine will compare your waist trends, thigh changes, and even body‑fat shifts against what you’ve eaten.
For example, if your waist shrank after a week of higher protein and lower carbs, the app will flag “protein‑rich meals correlated with waist reduction.” That little note can become a habit cue you trust.
Set up automatic meal tagging
Most modern trackers let you snap a photo of your plate. The AI then identifies foods, estimates macros, and logs them without you typing a single number. Just point, shoot, and let the algorithm do the heavy lifting.
In practice, you might photograph a bowl of quinoa, roasted veggies, and grilled salmon. Within seconds the app tags “salmon (protein), quinoa (carbs), veggies (fiber)” and adds those calories to the day’s total. Over time, the system learns your favorite meals and refines its guesses.
That’s the core of ZOZOFIT’s AI-powered nutrition tracking – it removes the guesswork and lets you focus on the plate, not the spreadsheet.
Connect the dots: measurements + nutrition trends
Now, turn on the “insights” toggle. The app will start showing you charts that pair your measurement changes with macro trends. You might see a line where “higher fiber intake = steady thigh measurements,” or “low‑sugar days = smaller waist fluctuations.”
When you spot a pattern, write a quick note right in the app – “added extra beans, waist held steady” – and you’ve just created a mini‑experiment you can repeat.
Actionable weekly check‑in
Every Sunday, after you log your numbers, open the insights screen. Ask yourself three simple questions:
- Did any food category spike or dip compared to the previous week?
- Did a specific meal coincide with a measurement change?
- What small tweak can I try next week?
Answering those in a sentence gives you a concrete action plan: “Swap soda for sparkling water on weekdays” or “Add a handful of nuts after lunch to boost satiety.”
Use AI recommendations, don’t follow them blindly
The AI is a guide, not a dictator. If it suggests “increase carbs on high‑intensity days,” test it for a week and see how your energy feels and whether your measurements stay on track. If the numbers don’t move, adjust the suggestion. Your body is the ultimate feedback loop.
And remember, the AI learns from you. The more honest notes you add – “felt bloated after pizza night” – the sharper its future recommendations become.
Quick tip: combine AI with hydration tracking
Many apps also let you log water with a single tap. Hydration shows up in the same dashboard, letting you see if a dip in waist size aligns with consistently hitting 2 L per day. Small habits compound, and the AI will point them out.
So, what should you do right now?
Grab your phone, snap a photo of tonight’s dinner, let the AI tag it, and then glance at the insights screen. Jot a one‑line observation about how the meal feels. That’s a tiny habit that turns raw measurements into smart eating decisions, day after day.
Step 4: Track Nutrition, Hydration, and Progress
Okay, you’ve got your measurements in the app and you’ve already started snapping weekly photos. The next piece of the puzzle is feeding the same dashboard with what you eat, how much water you drink, and a tiny habit of reflection so the numbers actually mean something.
1. Log every bite (without the headache)
Open the body measurements tracker app and look for the nutrition tab. Most apps let you snap a plate, then an AI tags the foods – no manual macro math required. If you’re using Foodie Cal, the “photo‑tag” button works just like the one praised by users of the Progress app, which “makes it very easy to track my progress” with photos and automatic entries. Tap, snap, confirm, and you’ve got calories, protein, carbs and fats logged in seconds.
Add a one‑sentence note right after the snap – “felt full after the quinoa bowl” or “craving hit after the soda”. Those tiny observations become the secret sauce that later tells you why a waist dip happened.
2. Hydration – the silent performance booster
Water shows up as a simple numeric field in most trackers. Set a daily target that matches the “2 L per day” rule many fitness coaches recommend, then tap the plus button each time you finish a glass. The app will flash a green check when you hit the goal, giving you that instant win feeling.
If you’re prone to forget, tie the habit to something you already do – like “after I brew my morning coffee, I’ll log a glass”. Habit stacking makes the action almost automatic.
3. Connect the dots every Sunday
Pick a quiet moment on your chosen logging day (Sunday night works for most). Open the dashboard and look at three panels side by side: measurements, nutrition summary, and hydration bar.
- Spot a pattern? Maybe a higher protein day lines up with a half‑inch waist shrink.
- Notice a dip in water intake the same week your waist bounced? That’s a clue.
- Write a single action point – “add an extra glass before bedtime” or “swap the afternoon cookie for a handful of nuts”.
This three‑minute review turns raw data into a mini‑experiment you can repeat week after week.
4. Keep the data safe and visual
Most iPhone apps, including the Progress app, sync with Apple Health and can back up photos to iCloud so you never lose a before‑after shot. Enable the backup option in settings, and you’ll have a secure library of both numbers and pictures.
Exporting a CSV once a month lets you create your own charts in Google Sheets if you love a deeper dive. It’s a tiny extra step that pays off when you want to see long‑term trends beyond the app’s built‑in graphs.
Quick checklist
- Snap a photo of every main meal and let the AI tag it.
- Log water each glass; aim for 2 L daily.
- Review measurements, nutrition summary, and water intake together every Sunday.
- Add one‑sentence notes to capture how you felt.
- Back up photos and export data monthly.
| Feature | What to Track | Quick Tip |
|---|---|---|
| Photo‑based food logging | Meals, snacks, portion size | Snap, confirm AI tags, add a feeling note |
| Hydration counter | Glasses of water | Link to coffee brew or bathroom break |
| Weekly review dashboard | Measurements, nutrition summary, water intake | Spot patterns, write one action point |
So, what should you do right now? Grab your phone, log tonight’s dinner with a quick photo, tap the water button after your last glass, and then jot down “felt satisfied, no cravings”. In just a few minutes you’ve turned a random dinner into data that will guide your next week’s choices. Keep the loop tight, stay curious, and let that body measurements tracker app do the heavy lifting while you enjoy the results.
Step 5: Engage with Avatar Interaction & Community Features
So you’ve got your numbers, your photos, and maybe even a 3‑D scan. The next leap is to make the app feel less like a spreadsheet and more like a buddy you can chat with. That’s where avatar interaction and community tools come in.
Why an avatar makes a difference
Imagine a little digital version of yourself that updates every scan – a visual “FutureMe” that you can rotate, zoom, and compare side‑by‑side. Seeing a 3‑D avatar shrink a bit around the waist is way more motivating than a single line on a chart. MeThreeSixty offers a 3‑D avatar that visualizes your progress, and many users report that the visual cue keeps them logging consistently.
And it’s not just vanity. The avatar gives you concrete reference points: “Did I really tighten my hips this week, or is that just a lighting trick?” It removes the guesswork that can sabotage confidence.
Setting up the avatar & joining the community
First, open the body measurements tracker app and look for the “Avatar” or “3‑D Scan” tab. Follow the two‑pose tutorial – a quick front shot, then a side shot. The app does the heavy lifting, turning those snaps into a sleek model you can tap.
Next, hit the “Community” button. Most trackers let you join groups based on goals (lose inches, gain muscle, maintain weight). Choose a group that matches your vibe; you’ll instantly see a feed of other avatars, progress snapshots, and short tips.
We recommend linking your profile to the Home – Foodiecal dashboard so you can toggle between personal stats and community updates without juggling multiple apps.
Once you’re in, introduce yourself with a quick note: “Hey, I’m Maya, trying to shrink my waist by 2 inches over the next month. My avatar’s looking a bit stubborn, any hacks?” That kind of honesty sparks conversation.
Daily engagement habits that feel natural
Don’t treat community time as a chore. Set a 3‑minute “avatar check‑in” after you log your measurements. Open the avatar, rotate it, and ask yourself: “What does this version of me tell me about today’s choices?” Then scroll the feed – maybe someone just posted a post‑workout snack idea that fits your macro goals.
When you see a fellow user celebrate a win, drop a quick “Congrats!” or a thumbs‑up emoji. Those micro‑interactions build a sense of accountability without feeling like a lecture.
And if you hit a plateau, ask the group for a specific tweak: “I’ve been steady for two weeks, should I add an extra glass of water or try a higher‑protein dinner?” The crowd‑sourced advice often uncovers simple changes you’d never think of.
Tips to keep the community vibe alive
1. Share a weekly avatar comparison. Post a side‑by‑side image of your avatar from two weeks ago and this week. It gives others a visual reference and invites feedback.
2. Celebrate tiny wins. Lost half an inch on your thigh? Post it! Small victories are contagious.
3. Start a themed challenge. Maybe a “hydrate‑30‑days” or “no‑sugar‑snack” thread. Challenges give structure and a built‑in reason to log daily.
4. Use the built‑in polls. Some apps let you ask the community a yes/no question (“Should I try a 20‑minute walk after dinner?”). The instant feedback feels like having a personal trainer in your pocket.
5. Respect privacy. If you’re shy about sharing your full avatar, crop to just the waist line or use the app’s anonymized mode. The goal is connection, not exposure.
Remember, the community isn’t a competition; it’s a support network that turns solitary data entry into a shared journey.
So, what should you do right now? Grab your phone, fire up the avatar scan, post that first side‑by‑side comparison, and type a quick hello in the community feed. You’ll feel the difference the moment a friendly comment pops up.
By treating your body measurements tracker app as a social playground, you turn raw numbers into a story you share with others – and that story is what fuels lasting change.
Keep the loop tight, stay curious, and let the avatar be your visual cheerleader.
![]()
Step 6: Optimize Your Routine & Export Data
Now that you’ve got a solid logging habit, the real power of a body measurements tracker app shows up when you start tweaking the routine based on the data and then pull that data out for deeper analysis.
Fine‑tune your measurement cadence
Most people log once a week, but you can experiment with a “micro‑cycle.” Try logging every three days for a month and watch how the trend line reacts when you add a new habit, like a 15‑minute evening walk. If the line smooths out, you’ve likely found a frequency that catches short‑term fluctuations without overwhelming yourself.
Example: Alex, a remote software engineer, switched from weekly to every‑third‑day logging while testing a new high‑protein breakfast. After two weeks his waist dropped 0.3 inches, a change that was invisible on the weekly view but crystal‑clear on the three‑day chart.
Layer nutrition and sleep signals
Most body measurements tracker apps let you attach notes or tags to each entry. Use a consistent tag system – “protein‑boost,” “late‑night snack,” “poor sleep.” Over a few weeks you’ll be able to filter the data and see, for instance, that nights with less than six hours of sleep correspond to a temporary 0.2‑inch waist swell.
According to the Livity app, advanced body composition analysis can highlight how sleep quality interacts with muscle‑mass trends, giving you a scientific backdrop for those observations.learn more about body composition tracking
Exporting for a fresh perspective
Most trackers offer a CSV or Excel export button in the settings menu. Here’s a quick checklist:
- Open the app’s settings → “Data Export.”
- Select the date range (e.g., last 30 days).
- Choose CSV for spreadsheet flexibility.
- Hit “Export” and save the file to a cloud folder you already use.
Once the file is in Google Sheets, create a pivot table that groups measurements by the tags you added. You’ll instantly see which tags line up with the biggest inches lost.
Real‑world spreadsheet hack
Maria, a busy mom of two, exported her data and added a column called “Energy Score” (1‑5). She discovered that days she scored a 4 or 5 (meaning she felt energetic) also had a slight thigh reduction. She now schedules a 20‑minute bike ride on those high‑energy days, turning a pattern into a habit.
Automate export reminders
Set a monthly calendar event titled “Export & Review.” Pair it with a habit stack – after you finish your Sunday meal‑prep, open the export screen, download the file, and spend five minutes scanning the pivot table. The ritual makes data export feel like another habit, not a chore.
Expert tip: combine export with visual dashboards
If you’re comfortable with a bit of design, import the CSV into a free tool like Datawrapper or Canva. Plot waist, hips, and body‑fat percentage on the same timeline, then overlay a line for “average protein intake” pulled from your nutrition log. Seeing the three lines together often reveals hidden synergies – for example, a protein spike coinciding with a steady waist decline.
What to do right now
1. Open your body measurements tracker app and note the export option.
2. Choose a 30‑day range and export the CSV to your preferred cloud drive.
3. In a spreadsheet, add a column for “Mood Score” and fill it for the past week.
4. Create a simple line chart that compares waist size with Mood Score.
If you spot a pattern – say, better mood equals smaller waist – you’ve just turned raw numbers into an actionable insight.
Remember, the goal isn’t just to collect data; it’s to let that data guide tiny experiments that add up to big changes. By optimizing your logging cadence, tagging the right context, and regularly exporting for a fresh look, you turn a body measurements tracker app into a true personal analytics engine.
Conclusion
If you’ve made it this far, you’re probably already feeling the shift that comes from turning vague feelings into real numbers. A body measurements tracker app isn’t just a digital notebook; it’s a tiny experiment lab you carry in your pocket.
Think about the moment when you logged that extra glass of water and saw your waist line level out a week later. That tiny cause‑and‑effect flash is the magic we’ve been chasing – data that whispers what works and what doesn’t.
So, what’s the next move? Grab your phone, open the export screen, and pull a 30‑day CSV. Add a “Mood Score” column, sketch a quick line chart, and look for patterns. If a higher mood consistently matches a slimmer waist, you’ve got a clue worth testing.
Remember, consistency beats perfection. Log once a week, tag each entry with a brief note, and let the app do the heavy lifting. Over time those snippets become a story you can actually see, and that story fuels motivation.
Ready to make your data work for you? Set a reminder for Sunday evenings, log your numbers, add a one‑sentence reflection, and watch the tiny insights add up to big confidence.
Take the first step today and watch progress happen.
FAQ
What exactly does a body measurements tracker app do for me?
Think of it as a pocket‑sized lab. You pop in your waist, hips, weight, maybe a quick photo, and the app stores each number in a timeline. Over days and weeks you start to see patterns – a dip after a high‑protein dinner or a tiny swell after a salty weekend. Those clues help you tweak meals, workouts, or sleep without guessing. In short, it turns vague “feeling” into solid data you can act on.
Do I really need to measure every single body part, or can I keep it simple?
You can start with just one or two metrics, like waist and weight, and still get value. The trick is consistency: measure the same spot every week, same time of day, after you’ve used the bathroom. If you later feel curious, add hips or thigh measurements. Each extra data point refines the story, but there’s no need to overwhelm yourself at the beginning.
How often should I log my numbers to see meaningful trends?
Most busy folks find a Sunday evening works – it’s a natural wrap‑up to the week and you can pair it with a quick reflection. Log once a week, and you’ll spot steady trends without feeling like a chore. If you want finer granularity, try every three days for a month; you’ll catch short‑term spikes that a weekly view might smooth over.
Can I trust the app’s AI suggestions, or are they just marketing fluff?
The AI isn’t a magic crystal ball; it’s a pattern‑matcher. It looks at the correlation between what you eat, how much you hydrate, and the measurements you logged. If it flags “higher protein days often line up with waist reduction,” that’s a hint, not a command. Test the suggestion for a week, see how your numbers respond, then decide whether to adopt it.
What if I forget to log one week? Will that ruin my data?
One missed entry won’t break anything. The app simply shows a blank spot on the timeline, and you can add a quick note later – “forgot Sunday, logged on Thursday instead.” Over time the gaps smooth out, especially if you stay consistent otherwise. Think of it like a diary entry you skip; the story still makes sense.
Is there any benefit to exporting my data, or can I just rely on the built‑in charts?
Exporting to a CSV gives you a fresh perspective. You can create custom pivot tables, add mood scores, or overlay sleep data you track elsewhere. Seeing a side‑by‑side chart of waist size and daily water intake in Google Sheets often reveals hidden links that the app’s default view might hide. Set a monthly reminder to export, add a column for “energy level,” and watch new insights pop up.